webpack 개념에 대해 잘 정리된 글이 있어서 참고하여 예제를 수행해보겠다.
참고 : 웹팩(Webpack) 이란, 웹팩 간단 정리 및 리액트(React) 기본 개발환경 세팅. [1]
웹팩(Webpack)이란?
프로젝트의 구조를 분석하고 자바스크립트 모듈을 비롯한 관련 리소스들을 찾은 다음 이를 브라우저에서 이용할 수 있는 번들로 묶고 패킹하는 모듈 번들러다.
쉽게 얘기하자면, 자바스크립트가 방대해지면서 관리하기가 어려워졌고 이를 모듈들을 여러 파일들로 나눠서 관리한다고 해도 꼬일 수 있었기 때문에 이를 잘 관리해줄 수 있는 시스템이 필요했다. 웹팩은 이런 복잡성을 줄이고 알아서 잘 체계화하여 관리해주는 패킹 툴이라고 이해하면 쉬울 것 같다.
예제 시작하기
먼저 예제 프로젝트 디렉토리를 만들고 해당 디렉토리에서 webpack 패키지를 npm 명령으로 설치하자.
$ mkdir webpack_example
$ cd webpack_example
$ npm install -g webpack
$ npm install webpack-cli
프로젝트 초기화
npm init 명령으로 프로젝트를 초기화 한다. 해당 명령을 실행하면 package.json 파일이 생성된다.
$ npm init
This utility will walk you through creating a package.json file.
It only covers the most common items, and tries to guess sensible defaults.

See `npm help json` for definitive documentation on these fields
and exactly what they do.

Use `npm install <pkg>` afterwards to install a package and
save it as a dependency in the package.json file.

Press ^C at any time to quit.
package name: (webpack_example)
version: (1.0.0)
description:
entry point: (index.js)
test command:
git repository:
keywords:
author:
license: (ISC)
About to write to /Users/victor/010_dev/webpack_example/package.json:

{
  "name": "webpack_example",
  "version": "1.0.0",
  "description": "",
  "main": "index.js",
  "scripts": {
    "test": "echo \"Error: no test specified\" && exit 1"
  },
  "author": "",
  "license": "ISC"
}


Is this OK? (yes)
다음으로 아래와 같이 프로젝트 파일들을 생성하자.
.
├── app
│   ├── Greeter.js
│   └── main.js
├── package.json
└── public
    └── index.html
index.html
<!DOCTYPE html>
<html>
    <head>
        <meta charset="utf-8"/>
        <title>Webpack Sample Project</title>
    </head>
    <body>
        <div id="root"></div>
        <script src="./bundle.js"></script>
    </body>
</html>
main.js
var greeter = require('./Greeter.js');
document.getElementById('root').appendChild(greeter());
Greeter.js
module.exports = function() {
    var greet = document.createElement('div');
    greet.innerHTML = "Hi there and greeetings !";
    return greet;
}
프로젝트 빌드하기
다음으로 webpack 명령을 사용해서 프로젝트를 빌드한다.
$ webpack app/main.js -o public/bundle.js
위와 같이 명령을 수행하면 다음과 같이 결과 메시지들이 출력된다.
$ webpack app/main.js -o public/bundle.js
Hash: 6f39d5d96671fbf31124
Version: webpack 4.42.1
Time: 55ms
Built at: 2020-04-03 14:02:49
    Asset      Size  Chunks             Chunk Names
bundle.js  1.09 KiB       0  [emitted]  main
Entrypoint main = bundle.js
[0] ./app/main.js 95 bytes {0} [built]
[1] ./app/Greeter.js 148 bytes {0} [built]

WARNING in configuration
The 'mode' option has not been set, webpack will fallback to 'production' for this value. Set 'mode' option to 'development' or 'production' to enable defaults for each environment.
You can also set it to 'none' to disable any default behavior. Learn more: https://webpack.js.org/configuration/mode/
정상적으로 빌드가 되면 public 디렉토리에 bundle.js 파일이 생성된 것을 확인할 수 있다.
이제 브라우저에서 index.html을 로딩해보자.
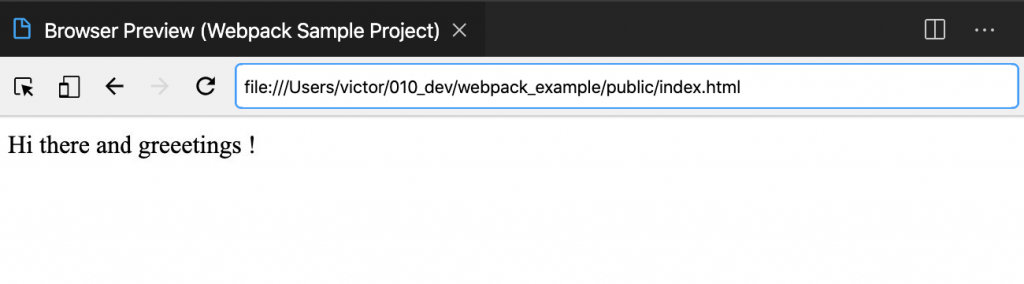
여기까지 webpack에서 entry 파일인 main.js를 이용해 bundle.js 까지 생성하는 기본적인 예제를 테스트 했다.
webpack configuration과 script 명령 만들기
반복된 작업은 configuration과 script화 하여 정리하는 것이 개발할 때 실수를 줄이고 시간을 효율적으로 활용할 수 있다. webpack에서는 webpack.config.js 파일을 이용해 다양한 프로젝트 빌드와 관련된 다양한 설정들을 할 수 있다.
프로젝트 디렉토리에 webpack.config.js를 생성하고 다음과 같이 작성한다.
module.exports = {
    context: __dirname + '/app',
    entry: './main.js',
    output: {
        path: __dirname + './public',
        filename: 'bundle.js'
    }
}
이렇게 webpack 설정 파일을 만들어주면 entry 파일과 output을 따로 명시할 필요 없이 webpack 명령만으로 빌드가 가능하다.
$ webpack
Hash: 6f39d5d96671fbf31124
Version: webpack 4.42.1
Time: 93ms
Built at: 2020-04-03 14:45:35
    Asset      Size  Chunks             Chunk Names
bundle.js  1.09 KiB       0  [emitted]  main
Entrypoint main = bundle.js
[0] ./main.js 95 bytes {0} [built]
[1] ./Greeter.js 148 bytes {0} [built]
이번엔 package.json에 script를 추가해서 npm 명령을 이용해 빌드해보도록 하겠다.
변경된 package.json 파일
 {
  "name": "webpack_example",
  "version": "1.0.0",
  "description": "",
  "main": "index.js",
  "scripts": {
    "start": "webpack",
    "my_script": "...."
    "test": "echo \"Error: no test specified\" && exit 1"
  },
  "author": "",
  "license": "ISC"
}
변경된 내용을 보면 start 스크립트 명령을 추가해서 webpack 명령을 실행하게 했다. my_script와 같이 자기만의 커스텀 스크립트 명령을 추가하는 것도 가능하다. 이렇게 추가된 스크립트 명령어는 npm run {스크립트 명령]과 같이 사용할 수 있다.
웹팩 개발 서버
웹팩 개발 서버는 간단한 node.js 익스프레스 앱으로 개발한 내용들을 브라우저에서 테스트할 수 있도록 서버로 실행되는 모듈이다. 사용을 위해서는 npm 명령으로 패키지를 설치해주어야 한다.
$ npm install --save-dev webpack-dev-server
webpack 서버 구동을 위한 설정을 webpack.config.js에 다음과 같이 추가해준다.
module.exports = {
    context: __dirname + '/app',
    entry: './main.js',
    output: {
        path: __dirname + './public',
        filename: 'bundle.js'
    },

    devServer: {
        contentBase: "./public",
        port: 8080,
        historyApiFallback: true,
        inline: true
    }
}
이렇게 수정 후 webpack-dev-server 명령을 다음과 같이 실행하자.
$ ./node_modules/.bin/webpack-dev-server
명령을 실행하면 다음과 같은 실행 결과가 출력된다.
$ ./node_modules/.bin/webpack-dev-server
ℹ 「wds」: Project is running at http://localhost:8080/
ℹ 「wds」: webpack output is served from /
ℹ 「wds」: Content not from webpack is served from ./public
ℹ 「wds」: 404s will fallback to /index.html
ℹ 「wdm」: Hash: 5ef5c40759fba01d508f
Version: webpack 4.42.1
Time: 374ms
Built at: 2020-04-03 15:56:47
    Asset     Size  Chunks             Chunk Names
bundle.js  362 KiB    main  [emitted]  main
Entrypoint main = bundle.js
[0] multi ../node_modules/webpack-dev-server/client?http://localhost:8080 ./main.js 40 bytes {main} [built]
[../node_modules/ansi-html/index.js] 4.16 KiB {main} [built]
[../node_modules/ansi-regex/index.js] 135 bytes {main} [built]
[../node_modules/html-entities/index.js] 231 bytes {main} [built]
[../node_modules/strip-ansi/index.js] 161 bytes {main} [built]
[../node_modules/webpack-dev-server/client/index.js?http://localhost:8080] ../node_modules/webpack-dev-server/client?http://localhost:8080 4.29 KiB {main} [built]
[../node_modules/webpack-dev-server/client/overlay.js] 3.51 KiB {main} [built]
[../node_modules/webpack-dev-server/client/socket.js] 1.53 KiB {main} [built]
[../node_modules/webpack-dev-server/client/utils/createSocketUrl.js] 2.91 KiB {main} [built]
[../node_modules/webpack-dev-server/client/utils/log.js] 964 bytes {main} [built]
[../node_modules/webpack-dev-server/client/utils/reloadApp.js] 1.59 KiB {main} [built]
[../node_modules/webpack-dev-server/client/utils/sendMessage.js] 402 bytes {main} [built]
[../node_modules/webpack/hot sync ^\.\/log$] ../node_modules/webpack/hot sync nonrecursive ^\.\/log$ 170 bytes {main} [built]
[./Greeter.js] 148 bytes {main} [built]
[./main.js] 95 bytes {main} [built]
    + 19 hidden modules
ℹ 「wdm」: Compiled successfully.
정상수행되면 http://localhost:8080 으로 접속할 수 있으며 앞서 만들었던 index 페이지가 출력된다.
이번엔 package.json에서 start 스크립트 명령을 수정하자. npm start를 실행하면 바로 서버가 동작하는 것이다.
package.json
{
  "name": "webpack_example",
  "version": "1.0.0",
  "description": "",
  "main": "index.js",
  "scripts": {
    "start": "node_modules/.bin/webpack-dev-server --progress",
    "test": "echo \"Error: no test specified\" && exit 1"
  },
  "author": "",
  "license": "ISC",
  "devDependencies": {
    "webpack-dev-server": "^3.10.3"
  },
  "dependencies": {
    "webpack": "^4.42.1",
    "webpack-cli": "^3.3.11"
  }
}
수정 후에 npm start를 하면 앞서와 마찬가지로 서버가 실행된다.
로더(Loader) 기능 알아보기
webpack에서는 loader를 명시해서 여러 모듈들을 import하여 사용할 수 있다. 이로인해 json 파일을 자바스크립트 모듈로 변환하여 사용할 수도 있고 리액트의 JSX를 자바스크립트로 변환하는 데도 이용할 수 있다. 다음 명령으로 json-loader를 설치해보고 테스트해보자.
$ npm install --save json-loader
webpack.config.js에 새로 설치한 패키지를 loader에 명시해준다.
webpack.config.js
module.exports = {
    context: __dirname + '/app',
    entry: './main.js',
    output: {
        path: __dirname + './public',
        filename: 'bundle.js'
    },

    module: {
        loaders: [
            {
                test: /\.json$/,
                loader: "json-loader"
            }
        ]
    },

    devServer: {
        contentBase: "./public",
        port: 8080,
        historyApiFallback: true,
        inline: true
    }
}